Demystifying UEFI
Today I did something really cool, made UKI (in the article) after few weeks of attempt.
Has this ever happened to you? After a long time, errors seem to go away and everything starts working again. Its such a nice feeling.
As an occassional low-level programming enjoyer, it feels really nice to work with something that you use everyday but are unaware of how it really works under the hood.
Let me show it by example, sqaure root, a simple thing right? How does it look in code, more simply how do you calculate it except just hit n trial? Computer does it in a deterministic way. Although I needed atleast 25-30 jump-to-definitions in Java's source code to find out how it actually worked. And simplified, its as simple as:
double sqrt(double n) {
  double a = n/2;  // TBH anything, really, except 0 ofc.
  for (int i = 0; i < 100; i++) {
    a = 0.5 * (a + n/a);
  }
  return a;
}What the ƒυ¢к? Weren't we trying to calculate n to the power of 1/2? Really we do, but we can write the equation of power 1/2 in linear form (power 1). Now for those interested in how does this work, refer Newton's Method, its really simple.
The point is, exploring 25-30 definition jumps was worth it in the end!
UEFI is quite similar too, its something that we use every single day, yet we're mostly unaware of how it works, and hence the curious boy will do everything to unravel the mystery.
Fundamentals about computers
I recently saw a video What is voltage? (joke video) posted on the April fools day, questioning why did it take you 5 years to fully understand the voltage. Its really funny one, I'd encourage you to check it out. Its really feels daunting when society makes it difficult, by telling partial-statements and incrementally correct it out with time while not telling the most obvious truth.
It may seem a bit boring, maybe. But the way we want to start demystifying UEFI is by looking at the most obvious truth about computers.
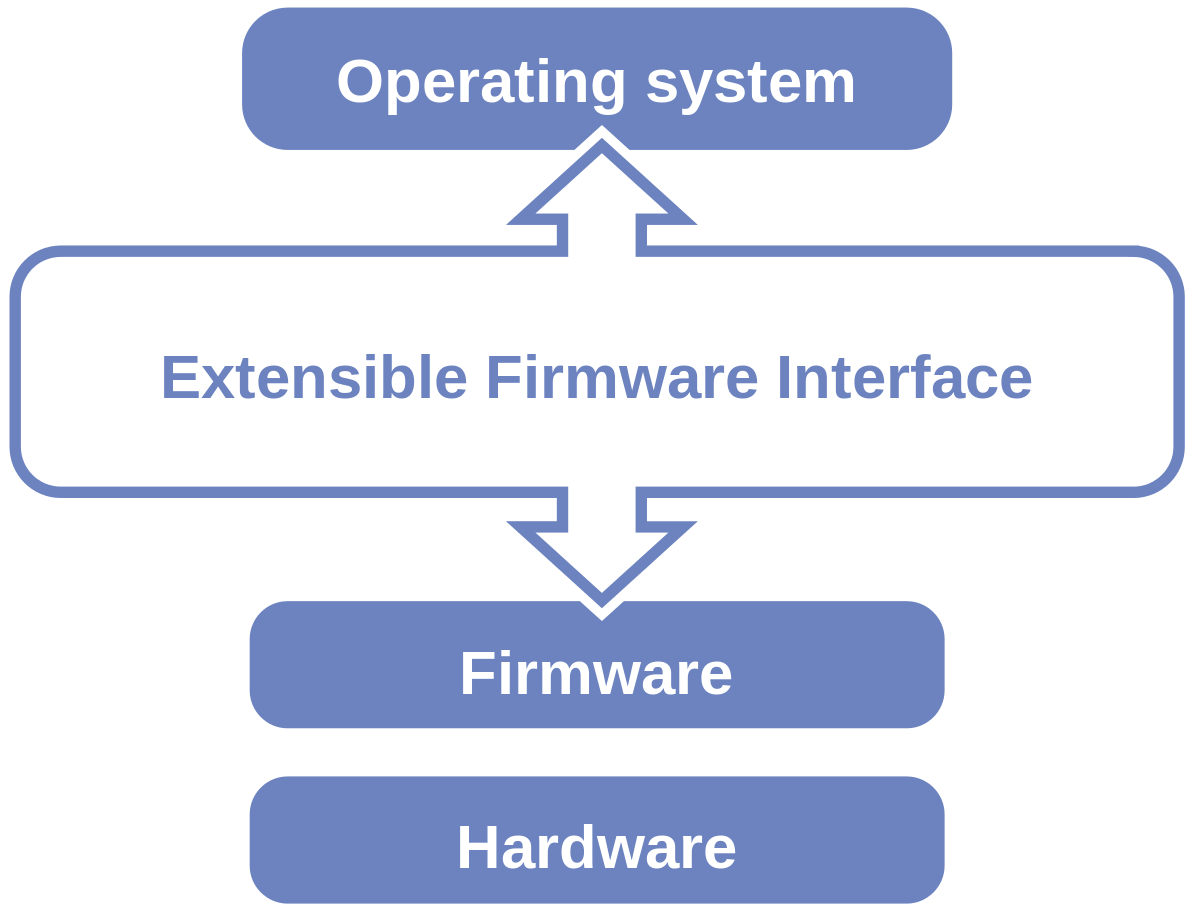
That computers are made up of little switches (also known as transistors). When we press the power button, we let some electricity flow into the BIOS/CMOS chip for a short duration of time. These chips generally contains an EPROM (Erasable Programmable Read-Only Memory) which is flashed with something called as a firmware-descriptor (fd) through some equipments externally.
With a small flow of electricity, the firmware-descriptor present (which also contains the UEFI screen you see by pressing f2/f10 at the boot time), in the chip starts the booting sequence, by opening some gate and activating DRAM, then CPU then rest of the components.
Once the RAM and the CPU is functional for the first time, it scans all the vFAT partitions in the connected drives and start looking for /EFI/*/*.efi files. Once it finds one, it tries to launch and give full hardware control to it.
The *.efi file
This one's really interesting. When your computer has just started off, it knows nothing about what to do, and this is the first file that tells it what to do.
In contrast, the *.efi file is just a simple binary, except that a few restrictions have been imposed by the UEFI Specifications, namely the binary must use Microsoft ABI, be position independent, and the binary format should be PE32+ (self-contained) not the regular ELF (OS-dependent) that we use.
If we understand even a bit of it, we know that we need to build a binary targeting Microsoft Windows, and it doesn't use any of standard libraries (since there's no OS).
So let's just make a Hello World efi binary, because,
Every single time.
- Linus Torvalds
EFI Programming Model
Before we begin, we first have to know a few things,
- We can't use any of the standard headers that depend on the OS, not even
iostreamorstdio.h. - UEFI fd exposes a few functionalities by giving our efi entrypoint two parameters, that are pointer of
EFI_HANDLEandEFI_SYSTEM_TABLE. The one that is useful to us is the latter one, it'll let us write to the console. - LLVM/Clang compiler toolchain (clang+lld) provides built-in support for cross-compilation (otherwise we'd have to compile gcc targeting windows and even after that we'd have to tell it to use Microsoft ABI at link-time).
Hello World in EFI
First let's install the dependencies we'd require to build our first EFI code:
sudo xbps-install clang lldHere's a basic Makefile setup for compiling our first EFI code.
CC := clang
LD := lld

CFLAGS := -ffreestanding -MMD -mno-red-zone -std=c11 -target x86_64-unknown-windows
LDFLAGS := -flavor link -subsystem:efi_application -entry:efi_main

default: all clean
all: main.efi

%.o: %.c
	$(CC) $(CFLAGS) -c $< -o $@
%.efi: %.o
	$(LD) $(LDFLAGS) $< -out:$@
clean:
	rm -fv *.o *.d

.PHONY: clean all defaultLet's open up main.c now and define out entry point,
#include <stdint.h>
uint64_t efi_main(void *handle, void *system_table) {
    return 0;
}and run make, it should produce a main.efi file, and we can run file main.efi to ensure its metadata are as expected.
$ make
clang -ffreestanding -MMD -mno-red-zone -std=c11 -target x86_64-unknown-windows -c main.c -o main.o
lld -flavor link -subsystem:efi_application -entry:efi_main main.o -out:main.efi
rm -fv *.o *.d
removed 'main.o'
removed 'main.d'

$ file main.efi
main.efi: PE32+ executable (EFI application) x86-64, for MS WindowsMaking a test environment
Till now, everything seems great, although I don't think its a good idea to just throw the efi file to the /boot/efi and start booting your laptop/pc from it.
A better approach would be to spin up a small qemu vm and run the efi image/binary from there.
First let's install the dependencies:
sudo xbps-install qemuNow we spin up a new qemu vm with current directory serving as a root filesystem to the vm:
qemu-system-x86_64 \
     -drive if=pflash,format=raw,readonly,file=/usr/share/qemu/edk2-x86_64-code.fd \
     -drive format=raw,file=fat:rw:$PWD \
     -net none \
-nographicThe important options are the two -drive options, first tells the VM to use the edk2 firmware-descriptor as UEFI (similar to one flashed on to your EPROM in the BIOS chip), the second mounts current directory ($PWD) as a vFAT filesystem in the VM.
Rest of options are just personal preference, -net none tells to not provide any network access to the vm, -nographic tells qemu can occupy our current terminal instead of a new graphical window (its convenient as I'm majorly a keyboard-centric guy).
This should drop you to a EFI shell, to load your efi file, run the following:
Shell> fs0:
fs0:\> main.efiIt outputs nothing, and that's good thing because there were no errors, hence everything worked perfectly!
Hello World in EFI (continue)
So far, we ran the efi binary, but we didn't print "Hello World" as we promised. So let's just do exactly that.
To do that, we can't use iostream or stdio.h, since there's no OS outside the UEFI environment there's no implementation of those headers, but we know that UEFI gave us two paramters in our entry point. Maybe that could help us?
And the answer is yes, the UEFI has started the screen and knows how to write something to the console, the pointer to EFI_SYSTEM_TABLE contains routines (function pointers) that we can call to perform some actions available.
So, let's modify our main.c file:
#include <stdint.h>
#include <stdbool.h>

typedef struct efi_table_header {
  uint64_t signature;
  uint32_t revision;
  uint32_t header_size;
  uint32_t crc32;
  uint32_t reserved;
} efi_table_header;

typedef struct efi_simple_text_output_protocol {
  uint64_t (*unused1)(struct efi_simple_text_output_protocol *, bool);
  uint64_t (*output_string)(struct efi_simple_text_output_protocol *self, uint16_t *string);
  uint64_t (*unused2)(struct efi_simple_text_output_protocol *, uint16_t *);
  uint64_t (*unused3)(struct efi_simple_text_output_protocol *, uint64_t, uint64_t *, uint64_t *);
  uint64_t (*unused4)(struct efi_simple_text_output_protocol *, uint64_t);
  uint64_t (*unused5)(struct efi_simple_text_output_protocol *, uint64_t);
  uint64_t (*clear_screen)(struct efi_simple_text_output_protocol *self);
  uint64_t (*unused6)(struct efi_simple_text_output_protocol *, uint64_t, uint64_t);
  uint64_t (*unused7)(struct efi_simple_text_output_protocol *, bool);

  void *unused8;
} efi_simple_text_output_protocol;

typedef struct efi_system_table {
  efi_table_header header;
  uint16_t *unused1;
  uint32_t unused2;
  void *unused3;
  void *unused4;
  void *unused5;
  efi_simple_text_output_protocol *out;
  void *unused6;
  void *unused7;
  void *unused8;
  void *unused9;
  uint64_t unused10;
  void *unused11;
} efi_system_table;


uint64_t efi_main(void *handle, efi_system_table *system_table) {
   uint16_t msg[] = u"Hello World!";
   uint64_t status;

   status = system_table->out->clear_screen(system_table->out);
   if (status != 0)
     return status;

   status = system_table->out->output_string(system_table->out, msg);
   if (status != 0)
     return status;

   while (1) {}

   return 0;
}Ok, too much to ingest. But first let's compile and run,
$ make
$ qemu-system-x86_64 \
     -drive if=pflash,format=raw,readonly,file=/usr/share/qemu/edk2-x86_64-code.fd \
     -drive format=raw,file=fat:rw:$PWD \
     -net none \
     -nographic
Shell> fs0:
fs0:\> main.efi

Hello World!Voila! We finally been able to write a Hello World on the UEFI console!
The code basically defines (because I wanted the code to be any dependency-free), and use the simple text io interface from the EFI_SYSTEM_TABLE (that is the second parameter to our entrypoint).
Where there are two important function pointers, clear_screen and output_string. It seems that accross the UEFI Specification they mostly use UCS-2 encoded strings (16-bit wide), so we define our string as unicode u"Hello World!" and pass it to the output_string.
That's it, now you can start whatever you want to do with UEFI, it also provides graphics and filesystem API through the same EFI_SYSTEM_TABLE so you can draw something or load up other binaries, kernels, and more. And that's what most UEFI implementations do, like for example grub, or other edk2 applications such as Ventoy.
Unified Kernel Image (UKI)
Another interesting usecase of learning about UEFI is that now you can make a portable linux efi image. That basically package efi-stub, initramfs/initrd, kernel, (optionally) rootfs all in a single *.efi file. Making computer need no more than a single file to boot up a linux.
They help us in two ways,
- Allow a direct netboot (without a disk).
- Boot up really really fast (ignoring middle-man like grub).
Let me tell you a story, a few weeks ago, in our college, we had to create a cluster for ML purposes, where we had to boot multiple computers at once and spin up all of them to do the required things. To do this, we obviously had to create a self-configuring or self-configured image, and perform a netboot (that can be done by serving the file from any computer using simple built-in http server: python3 -m http.server) so that we won't have to plug the USB stick everytime to each and every of the computers out there, and also to not affect the internal disks (that's why we're doing netboot), we had to load everything in RAM. What could be better than Unified Kernel Images?
And for geeks like us as well, who don't use more than 1 OS, we don't really need the grub, and thus we can speed up our boot process by utilizing the UKI.
So, let's try building one!
Building a UKI for currently running desktop linux
Fortunately enough, the dracut generally described as "a low-level tool for generating an initramfs/initrd image", supports building a UKI. So if you're on any modern linux distribution and already using dracut under the hood, you can easily adapt to UKI without much of a hassle.
To do this, first we would need a efi-stub,
sudo xbps-install gummibootand then we specify UKI configuration, in a file say my-dracut-uki.conf:
uefi=yes
uefi_stub=/usr/lib/gummiboot/linuxx64.efi.stubthe uefi=yes is the main option that produces the *.efi binary, and uefi_stub is required do that.
Now, since grub is going to get out of the way, we also need to specify the kernel parameters here so that they are passed at the boot time.
Currently used kernel parameters can be fetched from the /proc/cmdline file. So let's extract them, with our bash skills:
cat /proc/cmdline | sed 's/^\| /\n /g'Now copy them and place it within CMDLINE=, and hence our new config should look like:
uefi=yes
uefi_stub=/usr/lib/gummiboot/linuxx64.efi.stub

CMDLINE=(
    BOOT_IMAGE=/boot/vmlinuz-5.18.19_1
    root=UUID=bb4d72db-5f94-4390-b02c-a4de5a73235f
    ro
    loglevel=4
    "acpi_osi=Windows 2020"
    net.ifnames=0
    i915.enable_psr=1
    intel_pstate=disable
    nvme.noacpi=1
    intel_iommu=on
    rd.driver.pre=vfio-pci
    kvm.ignore_msrs=1
)
kernel_cmdline="${CMDLINE[*]}"
unset CMDLINEAfter that we're ready to create and add that *.efi into our boot entry:
dracut --force --verbose --kver $(uname -r) --conf my-dracut-uki.conf linux+initramfs.efi

sudo mkdir -p /boot/efi/EFI/void_custom/
sudo cp linux+initramfs.efi /boot/efi/EFI/void_custom/

sudo efibootmgr --create --disk /dev/nvme0n1 --label 'Void Linux - Custom' --loader /EFI/void_custom/linux+initramfs.efi

efibootmgr  # lists boot order
# manually set boot order making this UKI (0002) in higher priority
sudo efibootmgr --bootorder 0002,0001,2001,2002,2003Time to reboot and ensure everything works just like before, grub should be skipped and boot should happen from our new UKI linux+initramfs.efi image, and that will be significantly faster to boot than booting normally.
Instead of conclusion
Hopefully the article have given a good insight on how computers start, UEFI firmware-descriptor (fd), *.efi image (or binaries), and how later they use everything else to make computer run fully functioning. As well as for you to set-up a test environment for running that.
UKIs are also a great way to reduce the boot-time of the system.
Working with UEFI has great potentials, there's projects like grub2-theme-preview that helps you try out some great grub2-themes, and you can also get started with embedded development, EDK2 is a community project for UEFI development, that is also used by Ventoy a tool to create multi-boot USB with ease.
You can also make a custom portable pre-configured linux images, in a USB-drive that is loaded on the RAM using root=live:<URL> kernel parameter more info on dracut man page, that you can plug anywhere, and it'll contain all the configurations you like immediately after boot.
Backlinks:
- Steve Jobs